NOTE:
Copilot is a rapidly evolving collection of services from Microsoft.
This article is update to date as of the 6th of April 2024
References:
- Power Platform Licensing Guide April 2024.pdf
- Copilot for Microsoft 365 – Service Descriptions | Microsoft Learn
Summary
The Microsoft Copilot for Microsoft 365 (CM365 ) license is required to enable Copilot functionality across the suite of M365 apps and services. In this article, we will explain what the license enables and what each feature does.
This article will not cover: Costs, how to buy the CM365 licenses, how to assign licenses and how to get ready to deploy CM365 to an organisation.
After you have bought a license and it is available on the Tenant, you will see the following options to turn on/off. By default all capabilities are turned on.
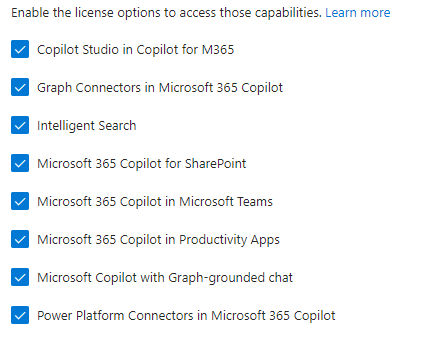
But what actually do each of them do/control/provide?
The Copilot for Microsoft 365 service description details what 6 of these capabilities provide (5 as service plans, 1 as a feature). The next 2 sections (Service Plans and Features) details the specifics of the associated service plans and features.
That leaves 2 (Copilot Studio in Copilot for M365 and Microsoft 365 Copilot for SharePoint) that aren’t referenced as part of the Copilot for Microsoft 365 service description. There are separate section to address these.
Service Plans
As with most Microsoft licenses, the CM365 license includes a number of service plans as part of the license. There are currently 5 service plans listed in the Copilot for Microsoft 365 service description. Each of which bundles together 1 or more features.
| Service Plan | Features |
| Microsoft 365 Copilot in Productivity App | Copilot in Word Copilot in PowerPoint Copilot in Excel Copilot in Outlook Copilot in Loop Copilot Whiteboard Copilot OneNote |
| Microsoft 365 Copilot in Microsoft Teams | Copilot in Teams |
| Microsoft Copilot with Graph-grounded chat | Microsoft Copilot Graph-grounded chat |
| Power Platform Connectors in Microsoft 365 Copilot | Power Platform connectors |
| Graph Connectors in Microsoft 365 Copilot | Graph connectors |
Features
There are currently 13 features in the Copilot for Microsoft 365 service description. I have divided them into two main categories:
- Productive Apps
- Services
| Feature | Description |
| Productive Apps | |
| Copilot in Word | Copilot in Word transforms your writing with efficiency and creativity – create, summarize, comprehend, refine, and elevate your documents. Now you can use enhanced capabilities like visualizing and transforming text into a table. Some other capabilities also include adding onto existing prompts, drafting a document by referencing up to 3 documents and discovering information about your document. |
| Copilot in PowerPoint | Copilot in PowerPoint helps you turn your ideas into stunning presentations. As your storytelling partner, Copilot can transform existing written documents into decks complete with speaker notes and sources or start a new presentation from a simple prompt or outline. Condense lengthy presentations at the click of a button and use natural language commands to adjust layouts, reformat text, and perfectly time animations. |
| Copilot in Excel | Copilot in Excel works alongside you to help analyze and explore your data. Copilot can help you explore and understand your data better. It helps analyze and visualize your data. Highlight, filter, and sort your data. |
| Copilot in Outlook | Copilot in Outlook helps you stay on top of your inbox and create impactful communication in a fraction of the time. Now you can ask Copilot to summarize an email thread to quickly jump to the source of the summarized content, suggested action items, replies, and follow-up meetings. You can also choose options for length and tone when drafting an email. |
| Copilot in Teams | Recap conversations, organize key discussion points, and summarize key actions. Get answers to specific questions, catch up on anything you’ve missed. Create meeting agendas based on chat history. Identifying individuals for follow-ups, and scheduling the next check-in. |
| Copilot OneNote | Copilot in OneNote helps you revolutionize the way you plan, and organize – staying better prepared and proactively taking action from notes. Now you can gain deeper insights on your notes by asking comprehensive questions, generating summaries of your content, ask Copilot to generate content for you, and help make your writing clearer. |
| Copilot in Loop | Copilot in Loop helps you unlock the power of shared thinking – co-create, get up-to-speed, and stay in sync with your teammates. Now you can iterate with Copilot collaboratively as a team, co-creating prompts, generating tables to help organize team projects, catch up where your teammates left off, summarize page content, and generate a recap for a teammate you’re handing work off to. |
| Copilot Whiteboard | Copilot in Whiteboard helps you kickstart and accelerate your ideation process to generate, categorize, and summarize your ideas. |
| Services | |
| Microsoft Copilot with Graph-grounded chat | Accessible via multiple surfaces, including within Microsoft Teams, at Microsoft365.com, and at bing.com/Chat. Your single destination to take on any task. Microsoft Copilot with Graph-grounded chat combines the power of Large Language Models with the Internet, your work content and context, and other apps, to help you draft content, catch up on what you missed, and get answers to questions via open prompts. |
| Intelligent Search | Unlock the ability to search data in your Dataverse applications such as Dynamics 365 Sales, Service & Finance and Operations using the intuitive natural language experience right from the copilot. |
| Power Platform Connectors | Access real time data from a collection of critical business and personal productivity applications right in the Copilot experience, enabled by our fast-growing catalogue of Copilot enabled Power Platform Connectors. |
| Microsoft Graph Connectors | Connect external data sources to Microsoft Graph using connectors and add up to 500 items per Copilot license. Benefit from deep retrieval of content in Copilot, Search & other intelligent experiences using the semantic index. |
| Microsoft Purview | Extend Microsoft Purview capabilities provided by your Microsoft subscriptions, e.g., Microsoft 365 E3 or E5 subscriptions to Copilot data and interactions. |
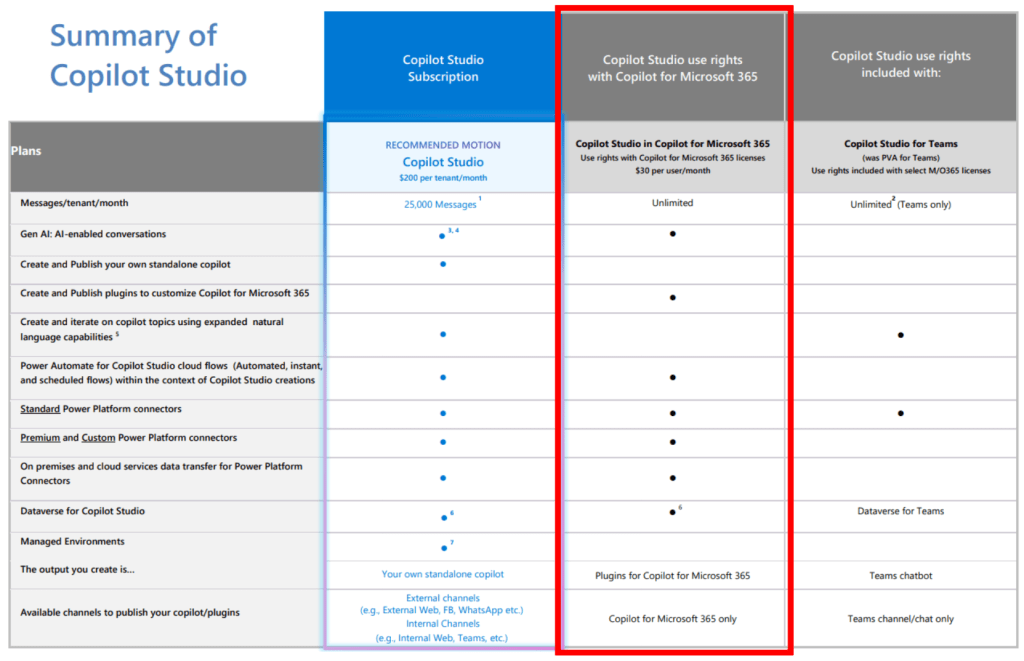
Copilot Studio in Copilot for M365
Importantly this is not a capability that controls a users ability to access Copilot Studio.
This license provides 2 specific capability:
- Output you create is: Plugins for Copilot for Microsoft 365
- Available channels to publish your copilot/plugins: Copilot for Microsoft 365 only
The Power Platform Licensing Guide describes the capability as:
Licensed Copilot Studio in Copilot for Microsoft 365 users can create, manage and publish plugins from
Copilot Studio to Copilot for Microsoft 365.
Basically, if you want a user to be able to make a customised Copilot in Copilot Studio and publish it to be used from M365 apps, turn on this option of the license.
Microsoft 365 Copilot for SharePoint
Best I can tell this functionality isn’t generally available yet.
It seems to relate to the M365 roadmap Feature ID item 124840 (LINK). This is currently list as starting to rollout May 2024.
Microsoft announce blog post: SharePoint in the AI Era: Introducing Copilot in SharePoint & 10 more innovations for creators
When it is released it will provide a Copilot side bar experience to help with content creation.

Conclusion and Recommendation
Hopefully, this has helped you understand what you get with the Microsoft Copilot for Microsoft 365 license.
To finish, I’ve shared my usual starting point for discussing with organisation which capabilities to turn on first:
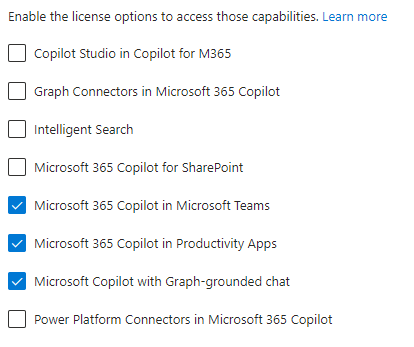
From experience, the three capabilities that most organisation start with are:
- Microsoft 365 Copilot in Microsoft Teams
- Microsoft 365 Copilot in Productivity Apps
- Microsoft Copilot with Graph-grounded chat
These are the features that are the simplest for users to try out and use to improve their daily tasks.